Most people don’t realize a rug can go from “time to replace this” to “looks surprisingly good” with just a few intentional moves. We’ve seen it in our own work at Queens Carpets Cleaning in Queens, NY — a rug that a customer was ready to toss ends up lasting another three or four years because they stopped doing the one thing that was slowly killing it. That thing? Over-vacuuming with a beater bar on a delicate weave. Or letting dirt settle into the base of the pile because they only ever spot-cleaned. Or assuming professional cleaning is just a luxury instead of a reset button.
The truth is, most of what wears a rug down isn’t age. It’s routine neglect wrapped in good intentions.
Key Takeaways
- Most rug damage comes from improper vacuuming, not foot traffic.
- Rotating your rug every season prevents uneven wear that looks like aging.
- Professional deep cleaning every 12–18 months restores fibers in ways DIY methods cannot.
- Sunlight and humidity matter more than most owners realize.
- The biggest mistake people make is waiting until a rug looks dirty to act.
The Vacuuming Mistake Almost Everyone Makes
We’ve walked into hundreds of homes where the vacuum cleaner is doing more harm than good. The problem isn’t vacuuming itself — it’s the equipment and technique. Most modern vacuums come with a beater bar, which is great for wall-to-wall carpet but terrible for fine rugs, especially hand-knotted wool or silk.
Here’s what happens: the beater bar spins at high speed, yanking at the fibers and slowly pulling them loose. Over time, you get a rug that looks fuzzy, frayed, and worn in the center while the edges still look fine. That’s not normal wear. That’s mechanical damage.
The fix is simple. Turn off the beater bar if your vacuum has a setting for it. If it doesn’t, switch to a suction-only attachment. We tell our customers to think of their rug like a sweater — you wouldn’t drag a spinning brush across a cashmere sweater, right? Same logic applies.
One customer in Astoria had a gorgeous Persian rug that was shedding like a cat. She thought it was just “breaking in.” After we cleaned it and showed her how to vacuum properly, the shedding stopped almost completely. That rug is still in her living room five years later.
Why Rotating Your Rug Isn’t Optional
Most people place a rug and forget about it. But sunlight hits one side of a room harder than the other, and foot traffic follows predictable paths. After six months, the side near the window is noticeably faded, and the walking path is matted down.
Rotating your rug 180 degrees every season redistributes that wear. It sounds obvious, but we can’t tell you how many people tell us, “I never thought to do that.” It takes two minutes and can double the visual life of a rug.
If your rug is under a dining table, rotate it when you change the table setting. If it’s in a hallway, flip it end to end when you deep clean. Make it a habit tied to something you already do — changing the clocks, swapping out seasonal decor, whatever works.
The Real Cost of Waiting Too Long Between Cleanings
Here’s a hard truth: by the time a rug looks dirty, the damage is already happening deep in the fibers. Dirt isn’t just ugly — it’s abrasive. Every time you walk across a rug, those tiny particles grind against the fibers like sandpaper. Over a year, that constant abrasion causes the pile to break down from the inside out.
We’ve cleaned rugs that looked fine on the surface but had a layer of compacted grit in the base that was essentially sawing through the fibers. That rug might have lasted another decade if it had been cleaned properly every 12 to 18 months. Instead, it needed replacing in five years.
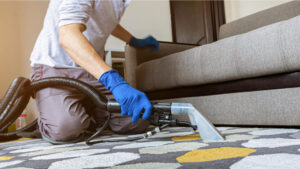
Professional cleaning removes that embedded grit in ways that vacuuming never can. Hot water extraction (steam cleaning) flushes out the particles that cause long-term wear. If you’ve got a rug that’s more than a few years old and has never been professionally cleaned, you’re losing money every month you wait.
For our customers in Queens Carpets Cleaning, we usually recommend a schedule of every 12 months for high-traffic areas and every 18 months for low-traffic rooms. That’s a reasonable cadence that balances cost with protection.
Sunlight Is a Slow, Silent Killer
This one catches people off guard. They think about dirt and spills, but they don’t think about UV light. Direct sunlight causes dyes to break down chemically, which leads to fading that looks uneven and aged.
The solution isn’t to block all light — that’s impractical. But you can rotate the rug (see above), use curtains or blinds during peak sun hours, or apply UV-protective window film. We’ve seen rugs that were vibrant on one half and washed out on the other simply because the sun hit that side every afternoon for three years.
If your rug is in a room with southern or western exposure, pay attention. That’s where the damage happens fastest.
Spot Cleaning Done Wrong Makes Everything Worse
We understand the instinct. You spill something, you grab a cloth and start scrubbing. But scrubbing is exactly the wrong move for most rug fibers. It pushes the liquid deeper into the backing, where it can cause mold, mildew, or delamination. It also distorts the pile, leaving a permanent mark that looks worse than the original stain.
The correct approach: blot, don’t scrub. Use a clean white cloth (colored cloths can bleed dye) and press down firmly to absorb as much liquid as possible. Then apply a cleaning solution designed for that specific fiber type. For wool, avoid anything with bleach or enzymes. For synthetic fibers, you have more flexibility, but always test in an inconspicuous spot first.
One mistake we see constantly is using store-bought carpet cleaners that leave a sticky residue. That residue attracts more dirt, so the spot gets dirty faster than the rest of the rug. You end up in a cycle of cleaning more often and making it worse.
When DIY Makes Sense and When It Doesn’t
There’s a place for DIY rug care. Regular vacuuming, spot blotting, and rotating are all things you should do yourself. But deep cleaning is where the line gets drawn.
Here’s a quick breakdown of what to do yourself versus what to hire out:
| Task | DIY or Pro? | Why |
|---|---|---|
| Weekly vacuuming (beater bar off) | DIY | Prevents surface dirt from embedding |
| Spot blotting fresh spills | DIY | Immediate action prevents staining |
| Rotating rug seasonally | DIY | Even wear distribution |
| Removing pet hair with a squeegee | DIY | Quick, no chemicals needed |
| Deep cleaning with steam extraction | Pro | Equipment and technique matter for fiber health |
| Removing set-in stains | Pro | Wrong chemicals can ruin dyes |
| Fringe cleaning | Pro | Fringe is delicate and easy to damage |
| Odor removal (pet urine, smoke) | Pro | Needs specialized treatments to neutralize |
We’ve had customers try to deep clean a large wool rug with a rented machine from the grocery store. They saved maybe $100 but ended up with a rug that felt stiff, smelled musty, and had visible water lines. A professional cleaning would have cost more upfront but left the rug soft, dry within hours, and smelling neutral. The rental machine couldn’t extract enough water, so the rug stayed damp for days and started to develop mildew.
Sometimes the cheapest option is the most expensive in the long run.
Humidity and Moisture: The Hidden Variables
Queens has humid summers and cold winters that force us to run heating systems that dry out the air. Both extremes affect rugs. High humidity encourages mold growth in the backing, especially if the rug sits on a concrete slab or in a basement. Low humidity makes fibers brittle and more prone to cracking, especially in antique or vintage rugs.
A dehumidifier in the summer and a humidifier in the winter can stabilize the environment around your rug. We’ve seen rugs in basements that looked fine but had a musty smell that wouldn’t go away. A dehumidifier fixed it within a week.
If your rug is on a concrete floor, put a vapor barrier or rug pad underneath. Concrete wicks moisture, and that moisture will eventually reach the rug. A good rug pad also adds cushioning and prevents slipping, which is a safety bonus.
The Padding Underneath Matters More Than You Think
Speaking of rug pads — this is one of those things people skip to save $20, and it costs them hundreds later. A rug pad does three things: it prevents slipping, it absorbs impact from foot traffic, and it lifts the rug slightly off the floor so air can circulate underneath. That airflow is critical for preventing mold and allowing the rug to dry properly after cleaning.
Without a pad, your rug slides around, which causes the edges to curl and the backing to wear unevenly. It also means the rug sits flush against the floor, trapping moisture and dirt underneath.
We recommend a felt-and-rubber combo pad for most rugs. Avoid the cheap mesh pads that crumble after a year. Spend the extra $30. Your rug will last years longer.
When a Rug Is Beyond Saving
Not every rug can be revived. If the backing has disintegrated, if there are large areas of rot or mildew, or if the fibers have become brittle and are breaking off, professional cleaning won’t fix it. In those cases, replacement is the practical option.
How do you know when it’s time? Run your hand across the rug. If you feel fibers breaking off easily, or if the rug has a persistent musty smell that doesn’t go away after cleaning, the damage is likely structural. Also check the backing — if it’s crumbling or flaking, the rug is done.
We’ve had to tell customers that their grandmother’s heirloom rug is beyond repair. It’s not a conversation we enjoy having, but it’s better than taking their money for a cleaning that won’t solve the problem. Honesty matters more than a sale.
The One Thing That Changes Everything
If you take away nothing else from this, remember this: prevention is cheaper than restoration. A few minutes of proper care each week, combined with professional cleaning on a reasonable schedule, will keep a good rug looking good for decades. The rugs we see that last 20 or 30 years aren’t the ones that were never used. They’re the ones that were maintained with intention.
We’ve been doing this long enough to know that most people don’t think about their rugs until something goes wrong. That’s normal. But the ones who take those small steps — turning off the beater bar, rotating the rug, calling in a pro every year or so — end up with rugs that still feel like an investment instead of a regret.
If you’re in Queens and your rug is starting to look tired, give it a chance before you give up on it. A professional cleaning and a few adjustments to your routine might be all it needs. We’ve seen it happen more times than we can count.
People Also Ask
Bringing an old rug back to life starts with a thorough, gentle cleaning. First, vacuum both sides to remove loose dirt and dust. For a deeper clean, mix a small amount of mild detergent with cool water and test it on an inconspicuous area. Gently blot stains with a soft cloth, never rubbing, which can damage fibers. Rinse with a damp cloth and blot dry. To restore vibrancy, consider professional cleaning. At Queens Carpets Cleaning, we use specialized techniques to revive colors and remove embedded grime without harming delicate materials. Finally, rotate the rug regularly to ensure even wear and keep it out of direct sunlight to prevent fading.
People sprinkle baking soda on carpet before vacuuming primarily to neutralize odors. Baking soda is a natural deodorizer that absorbs and traps unpleasant smells rather than just masking them. It works by chemically reacting with acidic odor molecules, turning them into neutral salts. For best results, sprinkle a thin, even layer over the dry carpet, let it sit for at least 15 minutes (or overnight for strong odors), and then vacuum thoroughly. While this method is effective for general freshness, it does not replace deep cleaning. For a truly comprehensive removal of trapped dirt, allergens, and embedded stains, professional services like those from Queens Carpets Cleaning can provide a much deeper clean that baking soda alone cannot achieve.
People sometimes put salt on their carpet as a natural cleaning method for specific stains, such as red wine or grease. The salt acts as an absorbent, drawing moisture and the stain out of the carpet fibers before it sets. For fresh spills, you can cover the area with a generous layer of salt, let it sit for several minutes, and then vacuum it up. This technique is a simple, non-toxic first step. However, for deep-set stains or heavy soiling, professional intervention is often more effective. At Queens Carpets Cleaning, we recommend salt only for immediate, minor incidents. For a truly thorough clean that protects your carpet's fibers and color, professional steam cleaning remains the industry standard.
To revive tired carpet, start with a thorough vacuuming to remove surface dirt and debris. Next, use a steam cleaner or hire a professional service like Queens Carpets Cleaning for a deep extraction that lifts embedded grime and restores fibers. For high-traffic areas, apply a carpet rake or brush to fluff the pile and redistribute wear. Spot treat stains with a gentle, pH-balanced cleaner, and consider a deodorizing powder to neutralize odors. Finally, improve airflow by opening windows or using fans to speed drying, which prevents mold and keeps the carpet looking fresh. Regular maintenance every 12 to 18 months can extend your carpet's life and maintain its original texture.